


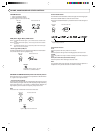

20
2
5
3
1
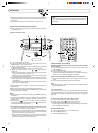
SLEEP
PROGRAM
RANDOM
REPEAT
AUTO
PRESET
DISPLAY
REVERSE MODE
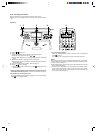
MULTI CONTROL
REW
FF
TAPE
TUNER
BAND
FM MODE
C D
DOWN UP SET
AUX
VOLUME
AHB PRO
SOUND
ACS
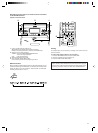
4
OPEN
BEAT CUT
AUX
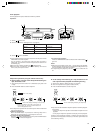
PRESET
TUNING
ONE TOUCH
REC
VOLUME
CD
TAPE
TUNER
MULTI CONTROL
REW
ACS
STOP
FF
BAND
STANDBY
ON/STANDBY
AHB PRO
AHB PRO
SPEAKER
ILLUMINATION
/ACS
SOUND
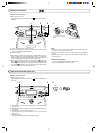
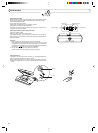
Synchronized recording with the CD player
÷ In this system, the CD player starts play when the cassette deck enters
the recording mode.
Operate in the order shown
Note:
This unit has recording characteristics suitable for normal and CrO2
tapes. Normal and CrO2 tapes have different characteristics from
metal tapes.
RECORDING
÷ During recording, the ALC (Automatic Level Control) circuit automatically
optimizes the recording level, so manual recording level adjustment is
unnecessary.
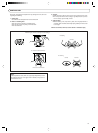
÷ Check that the safety tab on the cassette tape is not broken off.
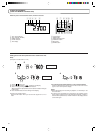
Useful functions for recording
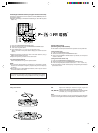
When the tape direction is set to 2 (reverse direction) after a cassette
tape is inserted...
1 Press the TAPE 23 button twice to change the tape direction to 3
(forward direction).
2 Press the 7 STOP button.
3 Change the mode to CD by pressing the CD 3/8 button.
(If a non-recorded tape with side A facing out is recorded in the reverse
direction (2), the recording is stopped immediately.)
When non-recorded sections between tunes are not required...
1 Press the CD 3/8 button twice. The CD player enters the pause
mode.
2 Press the ONE TOUCH REC button to start recording.
Note:
÷ Depending on the CD used, non-recorded sections of different lengths
may be left between tunes.
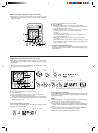
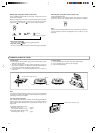
How to rewind a tape
1
Press the TAPE 23 button (to set to TAPE mode).
2 Press the 7 STOP button.
3 Press the 4 (REW) button.
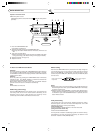
To record one track...
Play the track to be recorded. Then, press the ONE TOUCH REC button
to locate the beginning of the track and enter the one track recording
mode. After the recording is finished, the CD player and cassette deck
both stop.
To record only on side B or in the middle of a tape...
1 Load the cassette with the required side facing out.
2 Set the reverse mode to with the remote control unit.
3 Press the ONE TOUCH REC button on the main unit.
Synchronized recording starts and the cassette deck stops automatically
when CD playback is completed.
1 Load a CD and close the CD door.
2 Press the CD 3/8 button to engage the CD mode, then press the
7 STOP button to enter the stop mode.
3 Load a cassette with side A facing out. (Wind past the tape leader
before starting recording.)
÷ Make sure the tape direction is set to 3 (forward direction).
4 Select the required reverse mode ( or ) using the remote
control unit.
÷ When programmed play is required, program the required tracks
using the remote control. (See page 15.)
÷ Select tracks with a total playing time which does not exceed the
tape length (refer to the liner notes).
5 Press the ONE TOUCH REC button; synchronized recording will start.
÷ Recording starts in the forward direction and CD play starts
automatically.
÷ The forward direction indicator (3) blinks and the REC indicator
lights up in the display window.
÷ Non-recorded sections of approx. 4 seconds are automatically left
between tunes.
÷ When the CD player stops, the tape deck stops automatically.
÷ To stop recording in the middle, press the 7 STOP button. The cassette
deck also stops after 4 seconds.
Notes:
÷ During CD synchro recording, the CD 3/8 and (4, ¢) buttons do
not function.
÷ If a recording is completed in the reverse direction (2), it is possible to
continue recording without changing the direction to forward (3), until
the tape ends.
÷ If continuous play is selected, a recording in the reverse direction
(2) automatically stops at the end of the tape. The indicator appears
in the display window during recording.
÷ CD complete recording function (Synchro recording mode only)
If the tape is reversed while a CD is being played, recording will be
done on the reverse side of the tape as follows:
* When less than 10 seconds of the last tune on the forward side of the
tape have been recorded, recording on the other side of the tape will
start from the beginning of the previous track.
* When more than 10 seconds of the last tune on the forward side of
the tape have been recorded, recording on the other side of the tape
will start from the beginning of the current track.