


How to Run the Diagnostics
Use either the TrackPoint III or the cursor move keys to
interact with the tests. Pressing the Enter key works the
same as selecting the OK icon to reply OK.
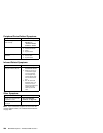
The following tools are required:
FDD:
Erasable 2HD diskette
Parallel:
Wrap plug (P/N 72X8546)
Serial:
Wrap plug (P/N 72X8546)
PCMCIA:
PC Test Card (P/N 35G4703)
CDROM:
Any CD (data CD is recommended)
1. Press and hold the F1 key; then power on the
computer. Hold the F1 key down until the
Easy-Setup screen appears.
2. Select Test and press Enter.
3. Select a device and press Enter to run the test.
4. The test progress screen appears.
5. OK appears when the test ends without any errors.
6. Start the Advanced Diagnostic test as either of the
following way:
Pressing Ctrl+A on the basic diagnostic menu
screen.
Triple-click the icon on the right bottom corner on
the basic diagnostic screen.
7. The ThinkPad FRU Connections screen appears.
This screen shows the state of the connection of all
connectors.
Check the connector if the Not connected message
appears on the screen.
8. Click on Exit on the screen or press Esc to exit the
screen.
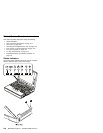
9. The keyboard test screen appears.
Check the keyboard.
10. Click on Exit on the screen or press Ctrl+Pause to
exit the screen.
11. Select a device and press Enter to start the tests.
The instruction appears, and follow the instruction on
the screen.
12. Select Test All to test all devices.
13. Select Loop Test to run the tests in a repeated loop.
A loop option menu appears in which a device loop or
all-device loop can be selected. Select a device and
press the Spacebar to select a device. Repeat this
step to select multiple devices. Press Enter to start
the diagnostic loop. If no device is selected, all
device tests are looped.
14. To exit the loop, keep pressing Ctrl+Pause until the
test exits. A beep sounds to notify that the exit
interrupt is sensed by the test program.
212 IBM Mobile Systems - ThinkPad HMM Volume 3