


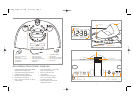
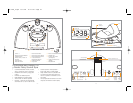

3. When the alarm is sounding, press the POWER BUTTON on the unit
to turn the alarm OFF (Fig. 1). The alarm will come on again the next day
at the same time.
4. To stop the alarm from coming on the next day, slide the ALARM
SWITCH located on the back of the unit to the OFF position. The AL1
and AL2 ICONS will disappear on the LCD display to indicate the
alarms are disarmed.
Note: If one of the alarm users still needs their alarm set, you will
need to slide the ALARM SWITCH located on the back of the unit to
the alarm that corresponds to their wake time.
Note: If the alarm sounds for 30 minutes continuously it will
automatically turn off.
Snooze Operation
1. Press the SNOOZE/NAP BUTTON on the unit while the alarm is sounding
(Fig. 1). The alarm will go off temporarily and will go on again in approx.
9 minutes. You may use this feature until you turn the alarm off.
Nap Operation
The NAP TIMER FUNCTION will wake you after a nap of 15, 30, 45, or 60 min-
utes without the need to change your regular Alarm 1 or Alarm 2 settings.
1. If the system is playing, press the POWER BUTTON to off (Fig. 1).
2. Toggle through the SNOOZE/NAP BUTTON until the corresponding
blue LED light illuminates next to the time of your choice, 15, 30, 45,
or 60 minutes (Fig. 1).
3. Toggle through the AL MODE BUTTON until the corresponding blue
LED light illuminates next to the wake mode of your choice, iPod,
sound, radio, or beep (Fig. 1).
Note: To wake to iPod, your iPod must be properly docked in the
unit, or it will default to beep wake mode.
4. The alarm will sound to wake you up after the selected amount of min-
utes has passed.
5. To cancel the NAP TIMER, press the SNOOZE/NAP BUTTON, until the blue
LED light is not illuminated, which indicates you are at the off position.
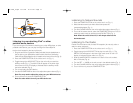
Dimmer Control
1. Press the DIMMER HI/LO BUTTON located on the back of the unit to
adjust the backlight intensity of the LCD display & the lights located
in the docking area (Fig. 4).
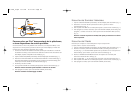
Using the Projection Feature
1. To turn on the projection feature, press the PROJECTOR ON/OFF
BUTTON located on the back of the unit (Fig. 4). The time is now pro-
jected on the wall or ceiling.
2. The angle of the projector can be adjusted to angle on the ceiling or wall
by moving the PROJECTOR TUBE forward or backward (Fig. 4).
3. To turn the angle of the time that appears on the wall of ceiling,
rotate the TIME ROTATION KNOB until you have reached your
desired result (Fig. 4).
Note: The TIME ROTATION KNOB will rotate up to 350 degrees.
4. To focus the time on the wall or ceiling rotate the FOCUS KNOB until
you have reached your desired result (Fig. 4).
14 15
SS-7000_6.qxd 8/17/06 11:31 AM Page 15