


5. After 5 seconds the display will stop flashing to indicate the time zone
is programmed.
6. If for any reason the time showing is not correct, please see Setting
Clock Time to set the clock.
Setting Clock Time
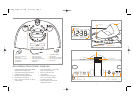
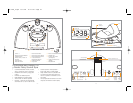
1. Press the TIME SET BUTTON located on the back of the unit (Fig. 4);
hour digit will begin flashing. Turn the SET +/- KNOB until the current
hour is displayed. Remember to set the correct AM or PM (an icon in
the upper left of the time display is the PM INDICATOR; there is no AM
indicator) (Fig. 2).
2. Press the TIME SET BUTTON again; minute digits will begin flashing.
Turn the SET +/- KNOB until the current minute is displayed.
3. Press the TIME SET BUTTON again to exit the clock setting mode or
after 5 seconds the display will stop flashing to indicate the time is set.
Replace Backup Battery
One lithium backup battery is already installed prior to shipping to keep
the clock running.
1. Make sure the DC adaptor is connected. Otherwise the time setting
may be lost during battery replacement.
2. Open the battery compartment cover located on the bottom of the unit.
3. Insert one 3-volt lithium battery (Model#: CR2025), checking that the
positive polarity faces toward you.
4. Close the compartment cover.
6 7
Before You Begin
The iSoundSpa uses a backup battery system to provide continuous
alarm and clock settings in the event of a power failure. When the Backup
Battery is installed – In the event of a power failure or the DC cord is
accidentally disconnected, the LCD display will not remain lit, but the
current time and alarm time settings will be temporarily maintained.
One lithium backup battery is already installed prior to shipping to keep
the clock running.
Getting Started
Determine Time Zone
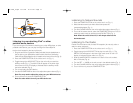
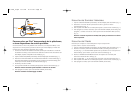
1. Attach the DC adaptor to the DC Jack located on the back of the unit.
2. Plug the cord into 120V household outlet.
Your iSoundSpa comes preset to Eastern Standard Time. Follow these
steps to match the setting where you live.
3. If your geographic location has DST (Daylight Saving Time) in effect,
adjust the time as follows: When daylight saving time begins, slide the
DST Switch located on the back of the unit to +1 to advance the time
by one hour. When daylight saving time ends, slide the DST switch to
the -1 to revert the time back by one hour (Fig. 4).
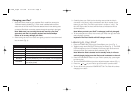
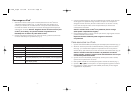
4. Press and hold the TIME ZONE BUTTON located on the back of the
unit for approx. 3 seconds until display flashes (Fig. 4). Turn the SET
+/- KNOB to select the time zone (Fig. 1).
01 - Atlantic 05 - Pacific
02 - Eastern 06 - Alaska
03 - Central 07 - Hawaii
04 - Mountain
SS-7000_6.qxd 8/17/06 11:31 AM Page 7