


EGO 4000 PLUS OPERATION MANUAL
11
5 POWERING THE UNIT
You can power the player from any of these
power supplies:
• 4 AA alkaline batteries
• Standard AC power using a DC 7.5V, 800mA
AC/DC adapter
USING BATTERIES
Follow these steps to install batteries:
1. Press down and slide the battery door in the
direction of the arrow on the cover and lift it up.
2. Place four AA batteries into the compartment
as indicated by the polarity symbols (+ and -)
marked inside.
3. Replace the battery door.
CAUTION:
• Always use fresh batteries of the specified
size by the manufacturer. Do not mix old and
new batteries, different types of batteries, or
rechargeable batteries of different capacities.
• If you do not plan to use the player with
batteries for a month or more, or if you
plan to use the AC/DC adapter only, remove
the batteries. Unused batteries can leak
chemicals that may destroy the electronic
parts inside.
NOTE:
• When battery symbol flashes on the display,
replace the batteries, as sound may distort or
volume weaken.
• When batteries are taken out, the time will
be stored in memory for 3 minutes. Please
replace batteries quickly to prevent the clock
from being reset.
• Dispose of old batteries promptly and
properly. Do not burn or bury them.
USING AC/DC ADAPTER
You can power the unit from a standard AC
outlet by using the included DC 7.5V 800mA
AC/DC adapter
Follow these steps to connect the AC/DC adapter
to the player:
1. Insert the AC/DC adapter’s plug into the “DC
IN 7.5V” jack on the right side of the player.
2. Plug the AC/DC adapter into a standard AC
outlet.
CAUTION:
When you finish using AC/DC adapter, disconnect
it from AC outlet first, then unplug it from the
unit.
NOTE:
Once an AC/DC adapter is connected to the unit, the
batteries installed will be disconnected automatically.
10
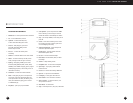
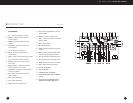
4 INSTALLATION AND CONNECTIONS
CONNECTING SPEAKERS
The player comes with two matched speakers
that are detachable. The player may be used
with the speakers docked in the lid, or with the
speakers detached. You may take remove the
speakers from the lid and place them where
you like by using the supplied connection wire.
Follow these steps to connect the speakers:
1. Press gently and push down to slide the
speakers out of the lid.
2. Using the supplied connection wire, connect
one end of the wire to the jack on the speaker
and the other to the “SPEAKERS L or R” jack
on the right side of the player.
3. Swivel out the built-in speaker stands for
stability and place the speakers where
you like, as permitted by the length of the
connection wire.
CONNECTING HEADPHONES
For private listening, you can listen to the player
with a pair of stereo earphones or headphones
with a 3.5mm plug by plugging it into the
headphone jack on the right side of the player.
Listening Safety
To protect your hearing, follow these guidelines
when you use earphones or headphones:
• Set the volume to the lowest setting before
you begin listening. After you begin listening,
adjust the volume to a comfortable level.
• Do not listen to the radio or music at
extremely high volume level. Extended high-
volume listening can lead to permanent
hearing loss.
• Once you set the volume, do not increase it.
Over time, your ears adapt to the volume
level, so a volume level that does not cause
discomfort might still damage your hearing.
Traffic Safety
Do not wear earphones or headphones while
operating a motor vehicle or riding a bicycle.
This can create a traffic hazard and could be
illegal in some areas. Even though some
earphones and headphones let you hear some
sounds outside when listening at normal volume
levels, they still can present a traffic hazard.