


HOW TO CONVERT JB-199 TO JB-199 CLIENT
The following directions are only for those who wishes to convert a JB-199 Standard to JB-199 CLIENT.
To convert JB-199 Dual Screen or Premier, please contact CAVS at techsupport@cavsusa.net.
5
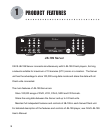
Be sure to have JB-199 Server connected as shown in the Section 2: How to Setup JB-199 Server.
7
Requirements:
5. Download the JB-199 Client Program from www.cavsusa.com and save it in a PC. Unzip the
downloaded program into 4 files. Next transfer the files into JB-199 as follows:
Router/Switch with number of ports equal (or more) to the number of JB-199
Server and Client(s)
PC monitors, mouses and keyboards (two sets or more)
JB-199 Client Program downloaded from www.cavsusa.com
From JB-199 Server, press ALT-F4 on the keyboard to exit to Windows Desktop.
Then right click on My Computer, and select Properties and Computer Name.
Check for the workgroup name (for example, CAVS) of JB-199 Server.
From JB-199, press ALT-F4 to exit to Windows Desktop.
Then right click on My Computer, and select Properties and Computer Name.
Press Change and type Computer name to be “Client-#” (# represents the client number.
For example, if it is 3rd client, the Computer name should be “Client-3”)
Type in the Workgroup name to be same as JB-199 Server.
Press Apply and restart JB-199.
From JB-199, press ALT-F4 to exit to Windows Desktop.
Transfer the 4 files into JB-199 using, for example, a USB memory device. If you have an
external CD/DVD disc drive, the files can be transferred using a disc also.
Copy Startup-n.bat to C:\NJB99\Prog folder of JB-199.
Copy JB99New.exe and JB99FTP.exe to C:\NJB99\Prog\Upgrade folder of JB-199
Double click to run JB199_Server.reg in JB-199 to update the registry.
1. Connect the PC monitor, mouse, and keyboard to JB-199 Server and JB-199.
2. Connect JB-199 Server and JB-199 to the same Router/Switch.
3. Turn on JB-199 Server first and then JB-199.
4. Set Computer Name and Workgroup name.