


Page 10
724-746-5500 | blackbox.com
Chapter 3: Preparing the Cabinet for Installation
3. To remove rear doors, disconnect the power supply, turn the cam lock with key
supplied, then lift the swing handle and turn it clockwise. Hold the left-hand
door in position while opening the right-hand door.
NOTE: Open without disturbing the sound-proof seals.
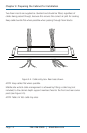
4. Each door has a cooling fan connected to a fan-speed controller placed behind
the side infills.
CAUTION: Make sure that the fan speed controller is NOT connected to its supply
BEFORE removing the rear door. Note the polarization of the
connector so you can connect it later.
5. Disconnect each fan at the rear of the door by squeezing the retaining clips on
the white connectors and pulling them apart. When the doors are open and
the main door is away from the frame, lift off each door and safely stand it
against a solid wall.
6. To re-hang the rear doors, reverse the procedure above.
NOTE: Remember to refit the fan connectors after reassembling the doors to the
cabinet and then reconnect the power supply.
To remove the side panels, simply turn the cam locks with the keys supplied and
lift the panel and place against a solid wall.
WARNING: Again, the panels are very heavy. We recommend that a minimum of
two people work together to remove the side panels.
3.5 Thermal Considerations
To maximize the thermal capabilities of the QuietCab Elite, we strongly
recommend filling all spaces on and around the front 19” area.
Sealing the front face of the 19” area keeps hot air from recirculating. Any air
gaps will impact the amount of heat removed from the cabinet.
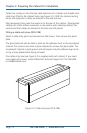
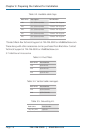
Fill the empty space on the 19” area with soundproof 19” quick-fit blanking
panels; see the selection of sizes in Table 3-1.
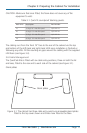
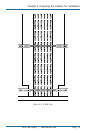
There is a gap above and below the 19” area even after all the equipment and
blanking panels have been fitted. We recommend filling this space using the 19"
infill foam supplied with the cabinet (see Figure 3-3).