


18
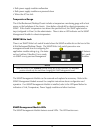
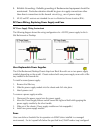
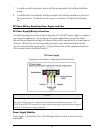
Temperature Gauge
The 3-Slot Desktop Chassis includes a temperature monitoring gauge with a heat sensor on
the backplane of the chassis. Users define a threshold for chassis temperature via SNMP. If
the chassis’ temperature rises above the specified level, the SNMP agent sends a trap
(configured in iView²) to the administrator. There is also an LED indicator on the SNMP
Management Module for chassis temperature.
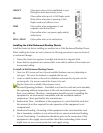
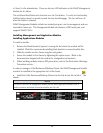
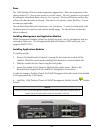
Installing the 3-Slot Desktop Chassis
Install the chassis first before installing any modules into a 3-Slot Desktop Chassis.
When installing the chassis, be sure to observe the following precautions to prevent electrical
or mechanical damage:
1.
Stay within the chassis’ power rating to prevent overload of supply circuits or damage to
any overcurrent protection and supply wiring.
2.
Maintain reliable ground, especially when connecting to a power strip instead of directly
to a branch circuit.
3.
Protect the chassis from exposure to sunlight and electrical or magnetic fields.
4.
Ensure that the equipment rack remains stable, even with the addition of the chassis and
its associated cabling.
Use the 3-Slot Desktop Chassis. as a table-top chassis, mount in a Rackmount shelf or mount
it to a wall surface.
1.
Install the 3-Slot Desktop Chassis by placing it on a flat surface.
2.
Make sure to leave adequate space on the sides of the unit to accommodate cooling.
3.
If mounting on a Rackmount shelf, align holes of the chassis to the shelf and secure with
screws.
The Rackmount shelf is sold separately. To purchase the Rackmount shelf (part number
(LMC5238); visit the Black Box Product Accessories page:
http://www.blackbox.com/Store/Results.aspx/search-LMC5238%5e%5e%5e/p-0
Rackmounting requires a Rackmount shelf for mounting up to two units side by side.
4.
Attach the cables between the chassis and the device that will be interconnected, and
then plug the unit into a reliable, filtered power source.
5.
If mounting the chassis on a wall, place two #10 panhead screws (not supplied) on the
wall according to the distance of the holes on the chassis, and then hang the unit on the
screws.
6.
All versions are intended for use in a Restricted Access Location (RAL).