


128-6825
5 of 10
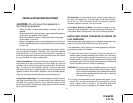
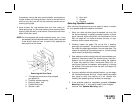
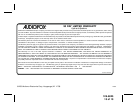
Removing the Door Panel
1. This opening would have to be enlarged
per dotted line
2. Possible speaker opening
3. Remove paper liner
4. Padded door panel
5. Window crank
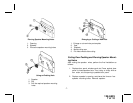
Selecting Speaker Location
After removing the door panel, you are ready to select a location
for the speaker. Make this selection as follows:
1. When the steel sub-door panel is exposed, you may find
the panel completely or partially covered by brown or black
paper secured with a sticky-black, tar-like adhesive. Do not
tear this paper off. It is there to insulate the door, to trap
moisture, and to reduce wind noise.
2. Carefully unpeel the paper. (Do not do this if speaker
openings are exposed.) You should now be able to see all
the varied size openings available in the sub-steel door. The
reason for exposing all the existing holes is to avoid cutting
metal unless it is absolutely necessary.
3. Now determine which existing holes will accommodate your
speakers. Temporarily install the window crank; place the
speaker into the opening and, while holding the speaker
in place, fully raise and lower the window. Check that no
moving part touches the speaker while opening or closing
the window. Then open and close the door and inspect for
speaker interference.
4. If you are satisfied with the selected location, you can begin
the installation process. But first, visually check the padded
door panel to verify that nothing on it will interfere with
installing the speaker grille (an armrest, for example).
5. If the selected location is acceptable, proceed to Speaker
Mounting, step 2; if the location needs to be changed,
continue with Speaker Mounting, step 1.
-5-
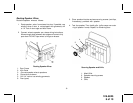
6. Door latch
7. Screws
8. Clip pins
If necessary, remove the door opening handle any accessory.
Unless screws are holding the door panel to the door frame,
which is very rare, you will find that most door panels are se-
cured by spring clips.
3. Using a broad flat tool between door and door panel, un-
fasten spring clips. If a few clips are bent when removing them,
a pair of pliers will easily re-form them. Once all clips are unfas-
tened, lift off door panel.
NOTE:On cars equipped with power windows, seats, etc., it may
be necessary to free the power switch plate, usually mounted
to the driver’s side arm rest, in order to fully separate the
door panel from the frame.