


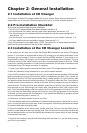


2.1 Installation at CD Changer
The location of these CD changer cables will vary by vehicle. Some common locations of
these cables are in the trunk, behind the glove box, and in or under a center console.
2.2 Pre-Installation Checklist
At this time and before beginning the installation:
• Your iPod’s Firmware should have been updated. (section 1.2)
• You should have your radio’s security code.(when applicable, see section 1.2)
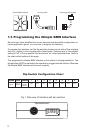
• The dip-switches on the interface should have been set with the proper conguration.
(see section 1.3)
• You should have in your possession the correct harness for your vehicle. (see sec. 1.3)
• You have determined your installation location. (see section 2.1)
If any of these steps has not been taken, STOP. Only when ALL of these steps have been
taken should you proceed with the rest of the installation.
3
Chapter 2- General Installation
2.3 Installation at the CD Changer Location
In this section you will learn how to install the iSimple BMW interface in the factory CD changer
location. If your vehicle is equipped with a factory CD changer you will need to disconnect it from
the factory pre-run harness in order to connect the iSimple BMW interface. If your vehicle is not
equipped with a factory CD changer, you will need to locate the factory pre-run harness. This may
involve the removal of the; center console, glove box, or carpeted side panels in the trunk. Please
consult your vehicle’s dealership or a local car audio professional for instruction or assistance with
locating the factory CD changer connection if necessary.
1. Connect your vehicle specic Harness to the factory pre-run CD changer harness in the vehicle.
2. Make any necessary wiring connections on your vehicle specic harness.
3. Now that the interface is connected to the radio, you will need to test the operation of the interface
before permanently running the iPod docking cable or re-assembling the dash. First, connect the
iPod cable to the iPod. The iPod should indicate that it is being charged. Turn on the factory radio
and press the button that would activate the factory CD changer to select the iPod. It may take up
to three minutes for the interface to initialize to the radio (this only happens the very rst time you
select the iPod). Once the iPod has been selected, press Play on the iPod. You should be able to
hear the music on your iPod through your factory radio. Now press the “Next Track” button on the
radio. The iPod should change to the next song on the iPod. By pressing the “Previous Track” but-
ton on the radio the iPod should change to the previous song. With the operation of the interface
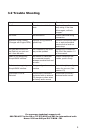
conrmed, you may continue with the installation. If you experience difculties in operation, please
see our troubleshooting chart in section 3.2.
4. Decide on a convenient location to mount your iPod.
5. Run the docking cable from the interface to the desired mounting location. Use caution to not cut,
pinch, or crimp the cable during this step. Avoid moving parts, vehicle wiring harnesses and areas
of excessive heat when routing the cable.
6. Secure the interface in the vehicle using; double sided tape, Velcro or wire ties. Make sure to
check for proper clearance and avoid moving parts. Take into account the size of the interface and
the wire harness and do not force the interface and harness into a space that is too tight, damage
to the harness may result.
7. Now that the interface is secured and the docking cable has been run, you are ready to enjoy
your iPod in your vehicle!